This post is in continuation to the previous post on Azure Storage Services where we learned how to deploy a storage account from the Azure portal. Now, we will explore the Azure Storage ARM Template deployment.
Before we start with that, a few things to note:
- It is advised to use Microsoft Visual Studio with the Azure Libraries to write the code for the deployment. (Microsoft Visual Studio is a very powerful tool that will provide intellisense for azure commands and the template can be deployed from Visual Studio itself).
- Azure Resource Manager Templates are written in JSON scripts, so it will be a plus point to have some basic knowledge in JSON scripting.
- The ARM template comprises three main files.
- JSON- The main template file where the resource is defined.
- parameters.json- The parameters template file that contains the parameters as defined in the main template file.
- Deploy-AzureResourceGroup.ps1- The PowerShell script that checks the deployment (validation) and finally deploys the ARM template to Azure.
- If you are not using the Microsoft Visual Studio, you can deploy the ARM script using a simple PowerShell command (listed at the bottom of the page).
Now let’s get started with the JSON script for deploying an Azure Storage ARM Template with Visual Studio.
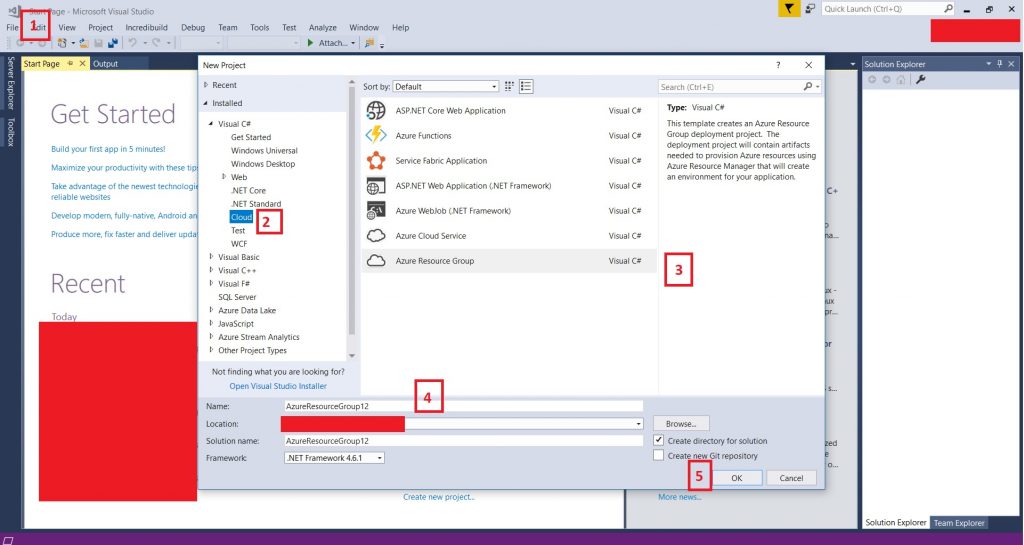
Steps 1-5: Fig.1
- Open Visual Studio and click on File-New-NewProject. If you have the Azure Libraries installed properly, you will see the Cloud options as shown in the Fig.1.
- Click on the Cloud option from the menu.
- Select the Azure Resource Group project type.
- Name your project (Visual Studio takes this name from default for the new resource group. However, it is not mandatory to use the same for the new resource group name.)
- Step 5: Click on OK and then the Azure Sample Repositories options page will appear.
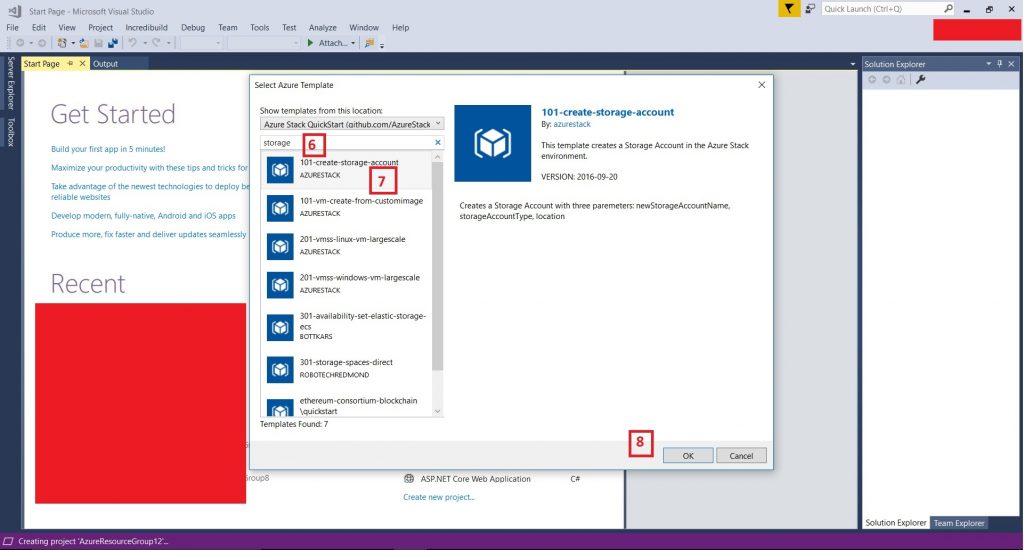
Steps 6-8: Fig.2
- In the search box type storage to select a sample template for deploying a storage account.
- Select the 101-create-storage-account option from the list (GIT repository
- Click on okay and go to the next page. Here the azuredeploy.json, azuredeploy.parameters.json and deploy-AzureResourceGroup.ps1 files can be seen in the solution explorer.
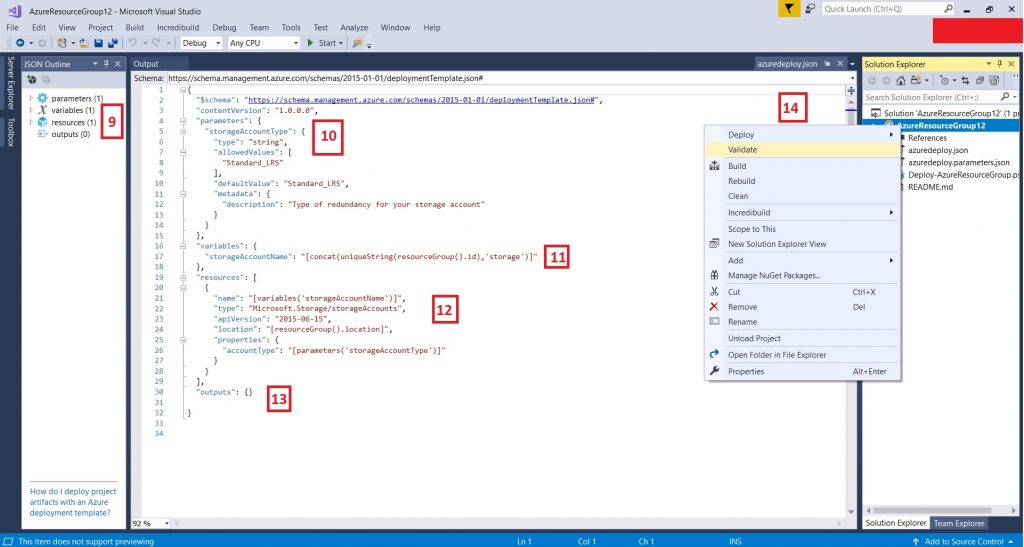
Steps 9-14: Fig.3
- After the template loads from Step 8, click on the azuredeploy.json file in the solution explorer (right-hand side). You will now see a JSON template for deploying a storage account in the Standard Tier with the LRS replication type. On the left-hand side, you will see a menu with 4 options. These are the integral parts of the deployment template.
- Parameters: Here you define all the parameters that you will be calling in the resources. These parameters are user-defined inputs for the respective values of the resources to be deployed.
- Variables: Here you define any variables that you will repeatedly use in the resource part.
- Resources: The resources that will be deployed are defined here. The integral parts over here are the name, type, apiVersion, location, properties etc (depends and varies from resource to resource).
- Outputs: This field can be used to identify the names/ schema of any resources that have been deployed from the ARM template.
- Now that we have a brief understanding of the JSON script, let’s go ahead and check the deployment. Before deploying the script, it is advised to first validate it. Right-click on the name of the solution and click on validate.
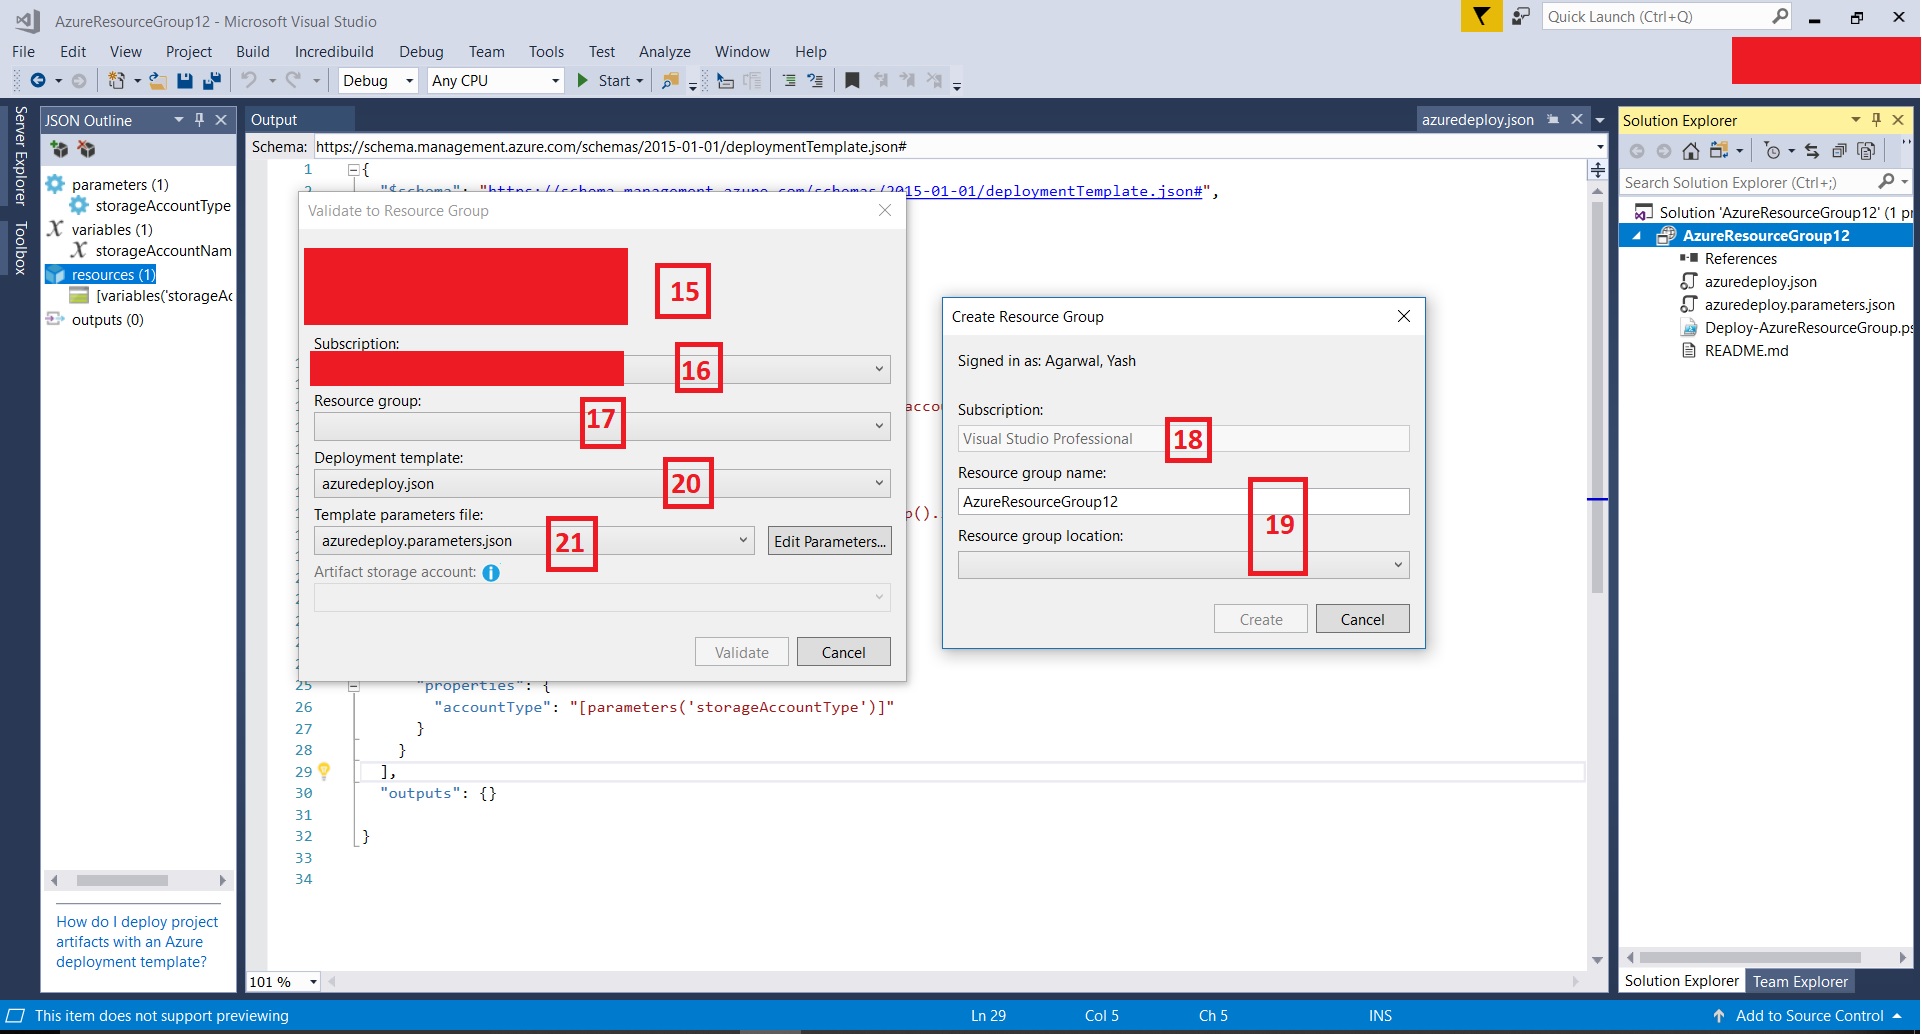
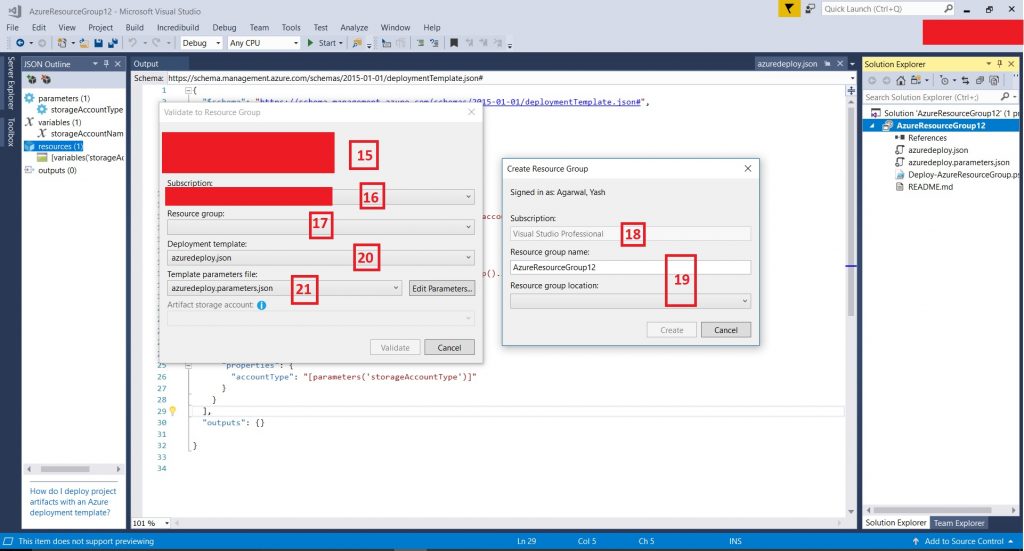
Steps 15-21: Fig.4
- After clicking the validate button in Step 14, a new window will appear as shown in the figure.
- Here you will be prompted to choose/ sign in to your Microsoft account that is linked to Azure.
- In this drop-down, you will have to choose the subscription in which you want to create this storage account.
- In this drop-down either choose an existing resource group or create a new one. IN case you chose to create a new one,
- The subscription chosen appears here.
- Type the resource group here and click on create.
- Select the main template file to be deployed (in case you are working on nested templates)
- Select the main parameters to file for the deployment and click on validate.
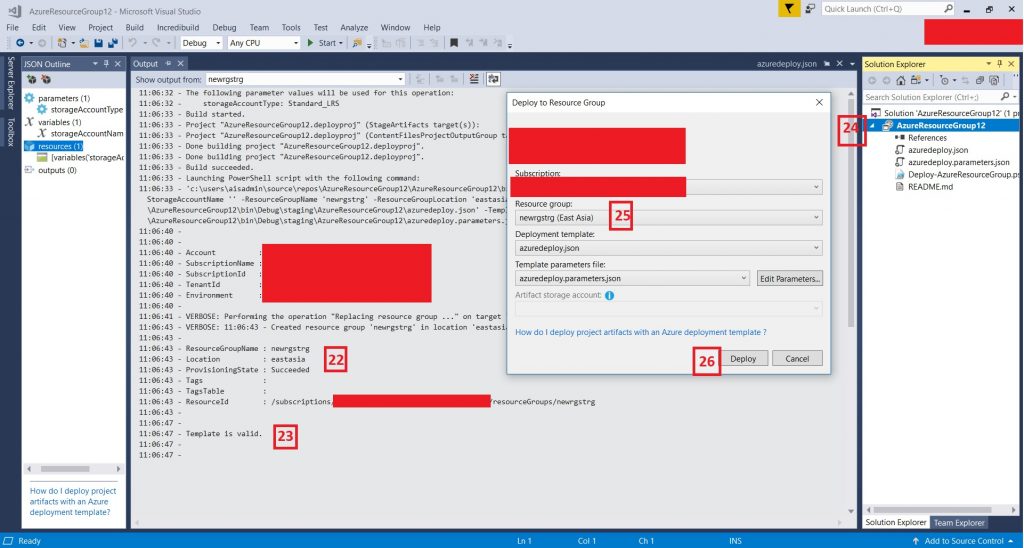
Steps 22-26: Fig.5
- Upon clicking the validate button from the previous button, an output screen will appear where you can see the account, subscription details.
- Check the location, resource group name. The resource ID is generated in the specified schema.
- If everything is correct, the template is valid.
- Now right-click the project name in the solution explorer and click on the deploy button. A new window pops up as shown in the figure.
- You will see the new resource group has been created here. Now if you wish to change any parameters, do so by clicking the Edit Parameters button.
- Click on Deploy and wait for the output screen to appear.
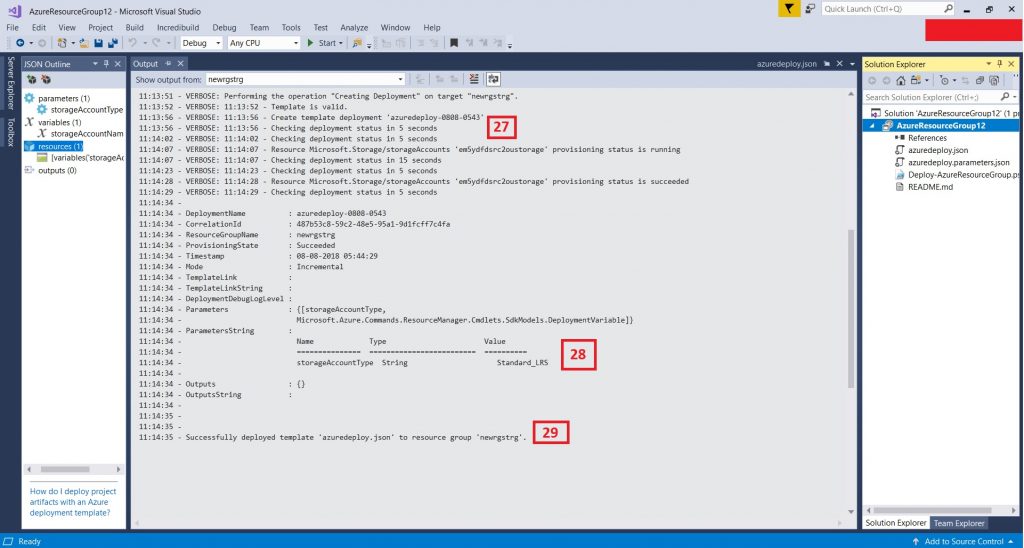
Steps 27-29: Fig.6
- The deployment of the script begins, and you can see the details of the account and validation etc. on the output screen.
- You can see the deployment has begun and based on the resource type, internet connection and such variables, the deployment proceeds.
- You can see the parameters that were declared at the time of deployment. In our scenario, we put the storage account type in the parameters field.
- The deployment is finally successful and you can see that the resource group and the storage account has successfully been deployed.
(Optional) Step 30: Deploying the ARM template from PowerShell.
- First login and connect to your account from PowerShell.
- Use the following command to create a resource group:
- New-AzureRmResourceGroup -Name testrgstrg -Location “Central US”
- Use the following command to deploy the template:
- New-AzureRmResourceGroupDeployment -Name DeploymentTest -ResourceGroupName ExampleResourceGroup -TemplateFile c:\azuredeploy.json -TemplateParameterFile c:\azuredeploy.parameters.json
In the next post, we will see how to create a storage account from PowerShell using the RM Library.
