In this post, we will have a look at the Azure Storage. Azure Storage is a robust, secure and highly scalable service from Microsoft Azure. Be it files, image files, videos, binary files, chat instances, backup logs, diagnostics logs and so on, Azure Storage has got your back.
To start with, the most straightforward way to create a storage account on Azure is through the Azure portal. However, we will also explore the PowerShell, Azure Resource Manager Template (ARM template) and Azure CLI options to deploy an Azure Storage Account.
Before we start, a few things to note before creating an Azure Storage Account:
- Naming Convention: Azure storage accounts need a globally unique name in small caps for the storage account (as it will be the DNS prefix of the URL that will be assigned to the storage account)
- Azure storage services can be broadly categorized as 1. Blobs (binary large objects) 2. Managed files, 3. Queues (messaging and chat applications), 4. Tables.
- Depending on the storage service that you create, the access URL will be created in the following conventions:
- Azure Blobs: storageAccountName.blob.core.windows.net
- Azure Files: storageAccountName.file.core.windows.net
- Azure Queues: storageAccountName.queue.core.windows.net
- Azure Tables: storageAccountName.table.core.windows.net
- Depending on the storage service that you create, the access URL will be created in the following conventions:
- Azure storage offers two types of disk storage: 1. Managed and 2. Unmanaged.
- Azure storage has two tiers: 1. Standard and 2. Premium.
- Azure storage offers four types of replications:
- Locally-Redundant Storage(LRS) is a low cost less durable but highly available replication type.
- Zone-Redundant Storage (ZRS) is a highly available, durable replication type. The data is replicated in sync across three storage clusters in a particular region.
- Geo-redundant Storage (GRS) is a highly durable replication type. The data is replicated in a secondary region and can be accessed as read-only if Microsoft initiates a fail-over in the primary region.
- Read Access Geo-Redundant Storage (RA-GRS) is an extension to the GRS type. In this type, the data can be accessed as read-only even if the fail-over has not been initiated by Microsoft.
- Let’s start with creating a basic storage account from the Azure portal (https://portal.azure.com)
- Log on to the Azure portal and sign in with your Microsoft account. Ensure that you have an active Microsoft Azure Subscription. For students, Microsoft allows you a 100$ free trial subscription for 1 month (create a Microsoft account with your university mail ID).
- Click on the Create Resource button on the table on the left-hand side.
- In the search box, type “Storage” and hit enter.
- Find the “Storage account – blob, file, table, queue” option and click on it.

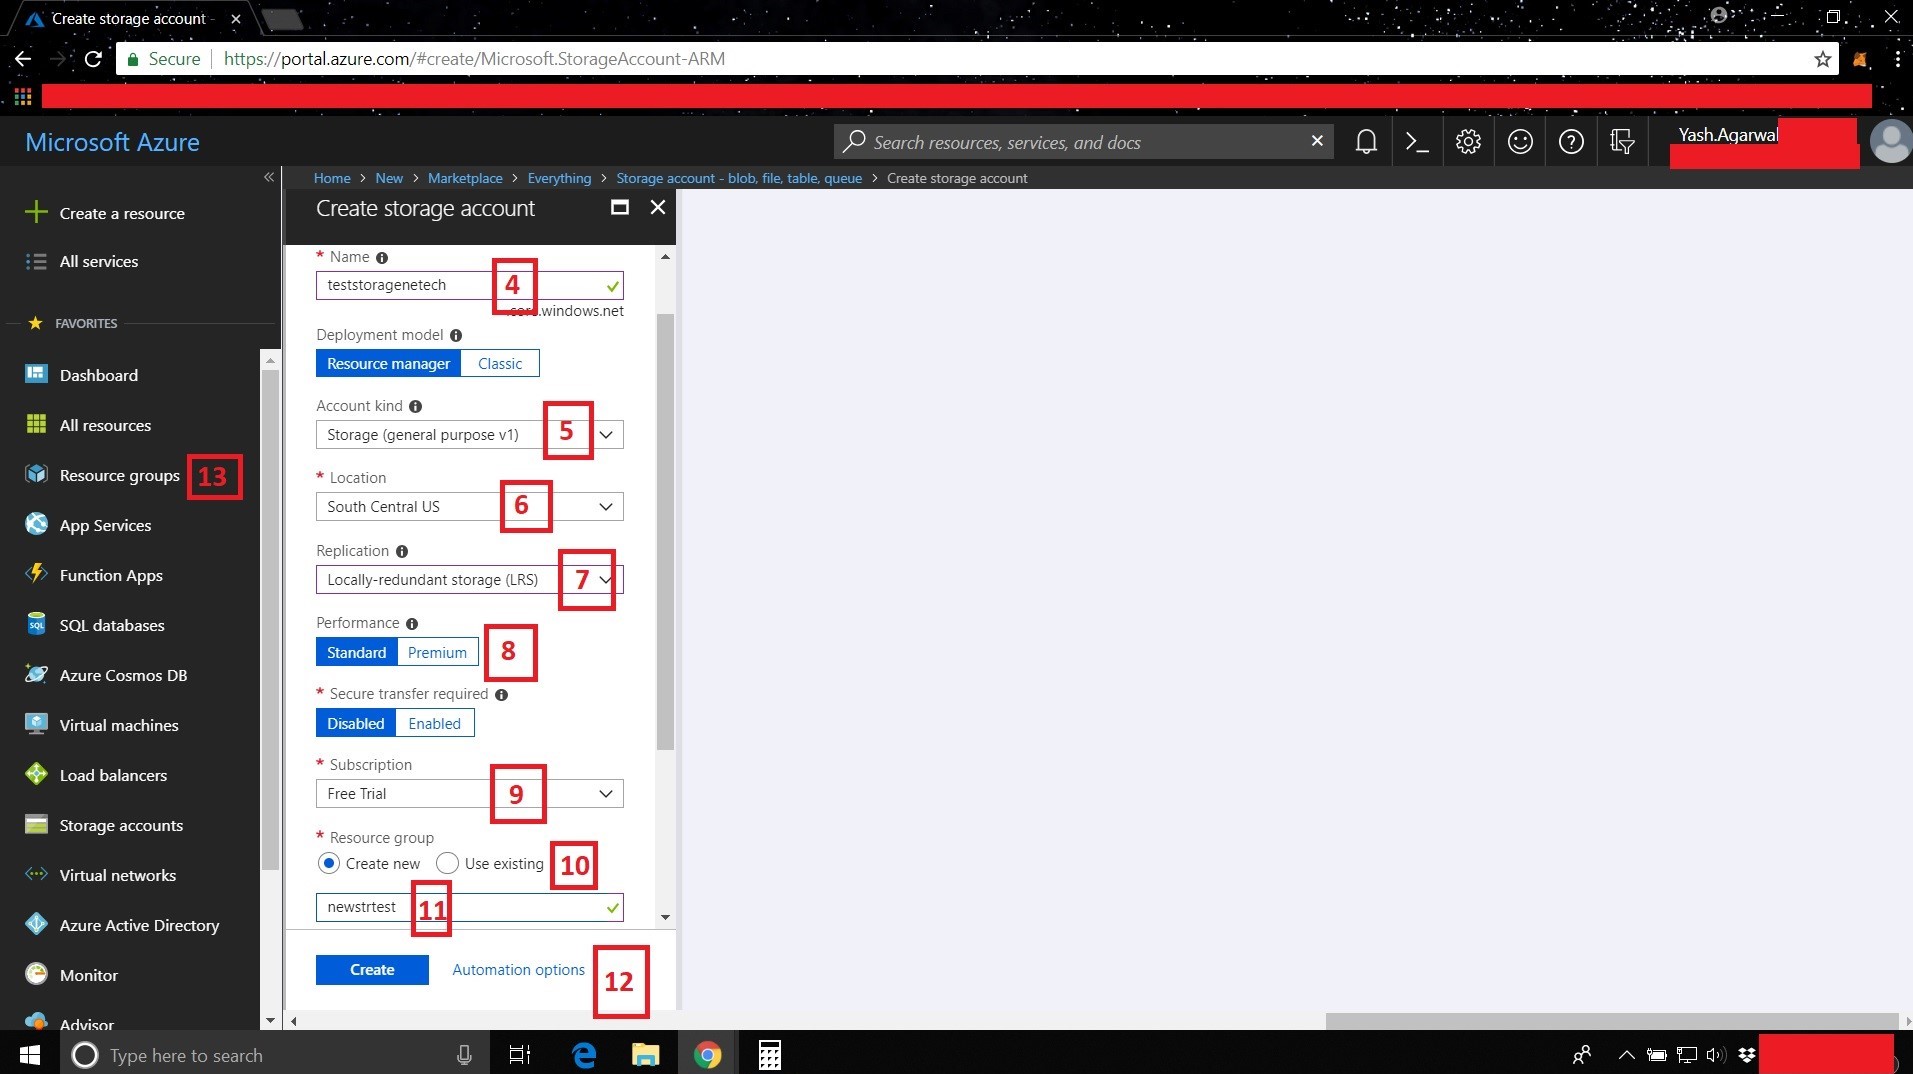
Step 4:- Name your storage account. A storage account name is a part of the DNS address and therefore it is required to be a globally unique name. It can be an alphanumeric string, but all the alphabets should be in lower case.
Step 5: Choose the storage account kind. Supported types are General Purpose V1, General Purpose V2 and Blob storage kinds.
Step 6: Choose a location for the storage account.
Step 7: Choose the replication type needed for the storage account. (For replication types, refer the above section).
Step 8: Choose the performance metric based on the application. Standard storage service is cheaper compared to the premium one. (Standard storage services are often backed by HDD’s compared to SSD’s used in the Premium storage types).
Step 9: Choose the subscription in which you want to deploy the storage account.
Step 10: Creating a resource group. In case you want to use an existing resource group, select the “Use Existing option” and choose the desired existing resource group from the drop-down menu.
Step 11: If you want to create a new resource group, type a name for the same in the textbox.
Step 12: Click the create button and you will be notified that the resource group will be created and then the resource deployment begins.
Step 13. Click on the Resource Groups button in the left hand-side menu. You will see that the resource group from Step 11-12 has been created and upon clicking on the resource group you will see the storage account has been created.
Now you can create a container and choose the type of storage (blob, file, queue, table) and start using the Azure storage services based on your requirements.

In the next post, we will see how to create a storage account from the Azure Resource Manager (ARM) Template.