As a product owner, you always worried about the different security aspect of your application and SQL Server Database is one of the main important parts for which you might worry.
And you always think there should be some kind of checklist which you or your team have to check whether your database is secure or not and find all the vulnerabilities.
And obviously you might have purchased different tools to this assessment as well who will provide you security loopholes but when we talk about Database the option is limited and some options are very costly.
With SQL SERVER 2017 latest SQL Management Studio your one of the problem will be resolved cross-check your database vulnerability.
You heard it right. Although, this feature is already available in SQL Azure now you can do this assessment of your database using SQL Server 2017 ’s management studio.
This vulnerability assessment report can be generated on the database with few simple clicks and you will get different High, Medium, Low risks of your database.
The vulnerability assessment report not only provides risks details but also help you to identify which category of it and this will not stop here you will get a recommendation as well to fix those problems. Sometimes, you will get direct scripts which you can run to fix those issues and sometimes you will get the links on how to implement those.
Let’s understand this by step by step action.
Before starting to make sure you have SQL Server 2017 Management Studio’s latest version.
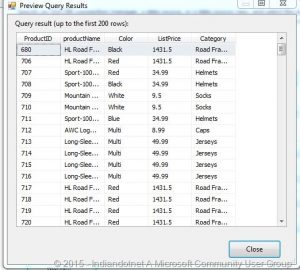
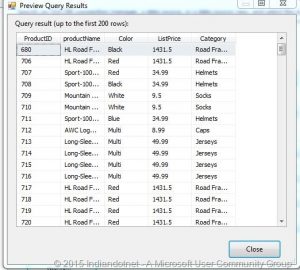
Step 1: Once you opened the SQL Server management studio right click on the database which you want to cross check. in this example, I am using the AdventureWorks database. As shown in the below figure.

Here you have 2 options either Scan for Vulnerabilities or Open Existing Scan
Step 2: Now, as we are doing it the first time to click on Scan for Vulnerabilities option. and you will get the following screen where you can provide the location of scan file.

Step 3:- Just click on OK button to proceed further and wow you will get all the loopholes of your database.
You can easily check what are different points on which your Database is failed with Risk Assessment.

As shown in the above figure, we have 6 checkpoints on which our database failed in which 1 is on high risk, 3 medium risk, and 2 Low risks.
And if you see carefully there are different categories as well as data protection, Authentication, and Authorization, Surface Area Reduction etc.
Here as the name suggest Data Protection is mostly related to encryption of your sensitive data like SSN, DOB etc or TDE.
Authentication and Authorization is more relation to login access to the database.
Surface Area reduction is more related to what extra option you have opened.
Step 4:- Now, move a step further and click on any row in the grid. You will find the details of the row just below the grid. As you can see in below image when we click on data protection it suggesting the column names which come under extra care and to on which we might think to apply encryption.

Step 5:- The story does not end here, for some of the problems this assessment report provides script as well and if the script is not possible then provide a reference link to resolve that issue.
As you can see in below screen we are getting recommendation scripts to apply.

Isn’t it cool and simple to assess your database’s vulnerability in a few clicks and secure your database?
Share your thoughts.
Happy learning!