In the previous post , we discussed about different algorithm types which help us in Machine Learning. Now, In this post, we will see how to work with Azure Machine learning studio.
So, let’s start with Step by Step how to use Microsoft Azure Machine learning.
Step1 :- You have to login into Microsoft Azure portal with your credential if you have not created yet then below is the link by which you can create your Azure account.

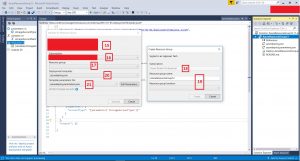
Step 2:- Click on Portal option of Machine learning as shown below. Here you have to click on “Create AN ML WORKSPACE” when you click on this option you will find the below the screen. You need to add workplace name and select the server location.

Once you done with above steps, you will find the below screen

Step 4:- You can open Azure ML studio by clicking Open Studio icon or you can click directly login into https://studio.azureml.net
Once you successfully logged in you will get the following screen.

In this screen, you will see different options like existing experiments created by you, samples by Microsoft etc.
Step 5:- You can check existing samples as well which are on different data analysis algorithms.

Step 6:- But, let’s not go with existing sample as we will try to create something from scratch. For that when you click on new Experiment then you get the following screen.
There is 3 main part of the studio screen. In Left panel, you will find different data sources , filters, transformation,models,Options. You just need to drag-drop on the central panel which will be our working area where as the right side panel will show the properties.

for our test, we can use already uploaded dataset or upload new dataset on which we want to create the model. In this example, we are using Adult Census income which is already available in dataset repository of Azure Studio.
Although, we can download same data from http://archive.ics.uci.edu/ml/datasets/Census+Income as well and upload to Azure Studio back. If we open the link you will find different attributes like age, sex, marital status, race country etc.
Before going further, let’s understand what we are going to do?
So, we are going to predict the income and determine/predict whether the income is more than $50,000 or not. The training model is based on the known inputs like age,education, job type, marital status, race and number of hours worked per week.
Just drag drop the data source (dataset) on the central panel.

You can visualize the data by right click on the central circle of each control. You can check data anytime in any step.

Step 7:- Now, this dataset might content some missing data values and for better result or prediction we will clean these data. To achieve this we need to drag-drop the Missing data control and provide dataset inputs. Here from the property panel you can set any value and replace it with the missing data value.
In this example, we will set the value to 0 (as shown in the figure). Now the output of this missing value is a proper dataset on which we can do the analysis.

step 8: Once we have proper dataset then our first goal is to split the data using split control . Here splitting data divide our dataset into 2 part

1) Training data :- With the help of this data we will train the Machine
2) Validation data :- This data is used to check the accuracy of prediction which we will apply.
We can set the ratio of these two parts by the properties.
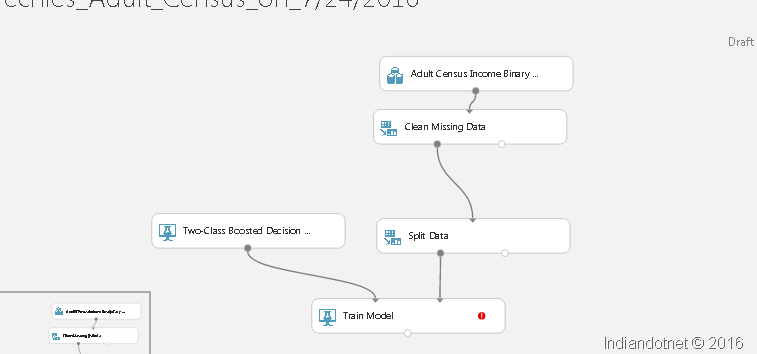
Step 9:- Here we need to apply the algorithm. Assuming the prediction result set we are going to use Two-class classification model. If you see in the left panel there are many classifications. For this example Two-class Boosted decision tree.

Step 10: Now, we have data with us on this data, we have to apply the algorithm and teach the model how to evaluate. for this, we will drag drop the “Train Model” control from left panel to our designer panel .

Here we need to configure “Train Model” . For this just provide the output of Split data (Training data output) to the Train model and also output of two class Boosted decision control’s output to train model. Once you set both the control then your screen will look like as below

Step 10:- Now once we have provided the input data to Train Model next thing is to provide the name of the column which we have to predict. for this click on Train Model. Check the right panel and select the column which you need to predict by clicking Launch column selector.

Step 11:- So far we are good, we have created the trained model now it’s time to score the model and cross-check the accuracy of the algorithm which we have applied. To evaluate the model we will drag drop a Score Model from the left panel and connect with Train model and the other validation data output of split data. Once you are done with this just press save button and run the model. if everything works well then there would be a right checkbox appear on control.

Step 12:- Once everything with green checkbox check as shown in the figure .

We will check data visualization by right clicking on score model.

You will find 2 additional columns which are Scored Label & Score probabilities. These two columns provide scored value and probability percentage

Although, we can have different methods as well to achieve the same task and we can evaluate the result of these different methods by one more control which is Evaluate Module. We have to drag-drop this module from left panel to designer and provide the Score model’s output to the evaluate module.
Although, we have only one training model with two class method but we can create another train model as well as compare them by providing output of the model to Evaluate module.

It provides a set of curves and metrics which we need to understand and choose the best train model if we are evaluating two train model.

Till now we have created a model. here are not going to save the model as a trained model and publish it we try to expose this model using a web service.

Step 13- Add output of web service dragging and dropping the web service output control and configure as shown below figure.

Step 14:- In the next step, we will publish the web service with the below button of the designer when you click on publish web service you will get the following screen after completion of the step.

Here just click on Test operation and you are good to go with Azure Machine learning experience.
I hope you will try yourself. Please , keep sharing your inputs.
Enjoy
RJ