In the last post, we discussed how to be a
smart developer in testing
To continue that smartness Smile I am sharing one of the best tools which are CODED UI.
A
CODED UI
is again a record and play concept what I mean here that you can record steps of your test case and play again and again whenever you want.
I know I made a simple statement for CODED UI but it is much more than that and you have full control on it. You can write your own custom code in CODED UI.
Although, this post is just starting or a basic information of CODED UI but it has many more things which we will cover later in our posts.
To understand, It better let’s start a step by step process. In this step by step process, I am using Visual Studio 2015.
The best part of CODED UI is that you can record test cases of windows & the web both the application.
Here we are taking the simple example of UI recording which is open a Calculator and perform the operation and another one is the open website in the browser and record the steps (in Next post).
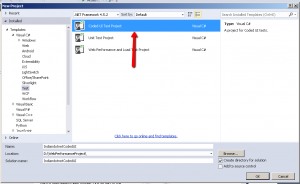
Step 1:- Open Visual Studio 2015. Create New Project and select CODED UI project as shown in below image. Here if you there are other options as well like Unit Test Project, Web Performance, and Load Testing Project.
So, those have their own unique properties which we will discuss soon.
Step 2:- When you click the OK button in above window you will get project is opened in Visual studio with certain predefined features and a new pop option appeared as shown in below figure.
It has 2 options which are self-explanatory. We are going with default option which is “Record action, edit UI map or add assertions.

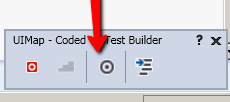
Step 3:- When you click this option then on your machine near taskbar you will find UIMAP Windows. Which is responsible for recording your action.

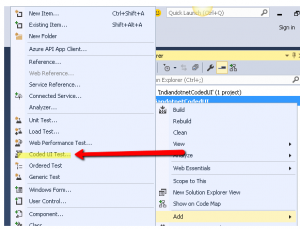
Step 4:- You can add Coded UI Test file by right clicking the project or add new Item option. This file contains all the recording steps. If the UImap is already open then you have to close it first and then add Coded UI test file.
Step 5: Once you added the file and UImap will appear then next step is start recording your steps of test cases. Here we are going to open the calculator and adding 2 numbers. so firstly click on the Record button of UIMap so ,it will start recording the screen. If you see below screen you will find the recording button change to the pause button.

Step 6:- Now we clicked on calculator button. It appears in front of us. We added first value 10 and then second value 20 and clicked on an equal button. then press pause button (as our first test case is completed). As the best practices we have to go step by step and record it but for this example, I am not following that. If you click the button nearby pause button as shown in below figure you will get all the recorded actions so far

Step 7:- Once you confirm with your Recording then you can click on Generate Code button and if you have any doubt then you can re-record or delete that particular recording. If you observe above steps I deleted Click ‘1’ button explicitly. I have recreated recording then clicked on Generated Code button. When I clicked I got the following option. Here you need to Provide method name and then save it.

Step 8:- Now to check whether the added value result is correct or not whether we have to fail this test case or pass we have to click on the guy as shown in below figure

Now, this is bit tricky part you have drag cross arrow from this control to Calculator’s result window and highlight as shown in the below figure.

Once this done then add Add Assertion by clicking the Add Assertion option as shown above image. When you click you will get the following screen

Once the above step is created Just click on Generate code once again. So that it will add Assertion logic as well.
So , far we have created a Coded UI test cases. Now , the challenge is how to cross check it. So here are steps.
Click on Test Option from Visual Studio menu click on Run option then click on All Test case options.
You will find all the steps that you perform (recorded) earlier will re-run and after execution, you can cross check. The test explorer.

If all the steps of test cases pass then according to assertion logic our test case will pass. as shown in below figure.

In this way, We have captured a windows application test cases and record and played accordingly. In the next step, I will show you how easy to cross check web application as well.
Please, provide your input what you think of this article.
Happy weekend!
Enjoy.
