In the Series of Zero to hero in SSIS this is another post. In this post we are going to discuss Merge transformation control.
By the name it is clear that Merge transformation do some merge related task. For example suppose there is two sources which are source1
and source2. Now we want merge records of Source1 & Source2 then this transformation is helpful.
Although, sometimes you might confuse that there is already UNION ALL transformation the when to use UNION ALL or Merge transformation.
For Merge transformation we require sorted inputs and there is only two inputs required. The output of merge transformation will be sorted output.
Let’s start it Step by Step
Step 1:- Firstly configure the sources. In current example I am using AdventureWorks2008 database’s person table and using FirstName, LastName, MiddleName columns as a Source1. For Source2 I am using AdventureWorks2012 database’s person table and using FirstName, LastName, MiddleName again. (You can choose any different source like flat file, excel ,other data source provider as well to make it simple I am using same source)

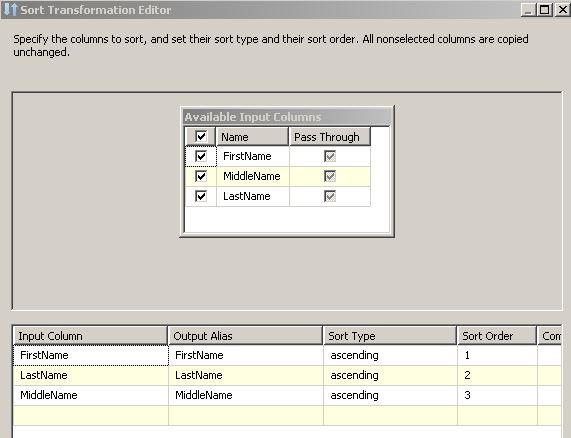
Step 2:- Once you setup your data source the next mandatory condition is the output should be sorted. So here we are using Sort transformation control. Now for first source we are sorting data on FirstName,MiddleName, LastName.

and for second source we are sorting data on FirstName , LastName ,MiddleName
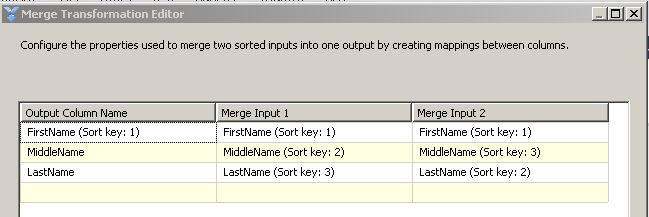
Step 3: Now once we have two sorted input we are going to use Merge transformation control so just drag drop and configure it. As shown in below figure. So there are two inputs which is Merge Input 1 & Merge Input 2 and we configured the data according to our need. And if you see below screen you will find “Configure the properties used to merge two sorted inputs into one output” which means for Merge transformation we require two sorted inputs only.

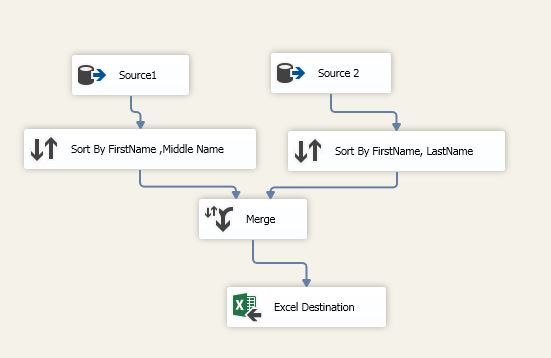
Step 4:- Now,we want the output of merge transformation in an excel so, here dropped Excel destination and configure it.So you can see below configured package with excel destination.

Step 5:- Now just hit F5 or run it. If everything configured properly then you will get all the green checks with no of rows count at each level as shown in below figure

Step 6:- We can cross check Excel also so in my case we got the required data as shown in below Excel’s snapshot.
So, Isn’t it simple ?
Here the important points to remember
1) Merge requires Sorted inputs only
2) Merge requires only two inputs
I hope this tutorial might help you. I appreciate your feedback.
Enjoy !!
RJ!!